

You know those nights? The ones where you crave something utterly comforting, but you're also just... tired? That was me a few months ago. I was staring into the fridge, dreaming of a juicy cheeseburger, but the thought of grilling and buns felt like too much. Then, a lightbulb moment! What if I rolled it all up? The first batch of these beef Cheeseburger Rollups was honestly a revelation. Quick, packed with flavor, and so much fun. My family devoured them, and I knew I had to share this genius little hack with you, my friend.
Oh, the first time I made these, I was so excited I totally forgot to drain the beef after cooking! My beautiful beef Cheeseburger Rollups were, let's just say, a little 'soggy bottom' situation. Oops! I didn't expect that. My husband was a good sport, but we definitely learned that draining the fat is, like, a non-negotiable step. Live and learn, right?
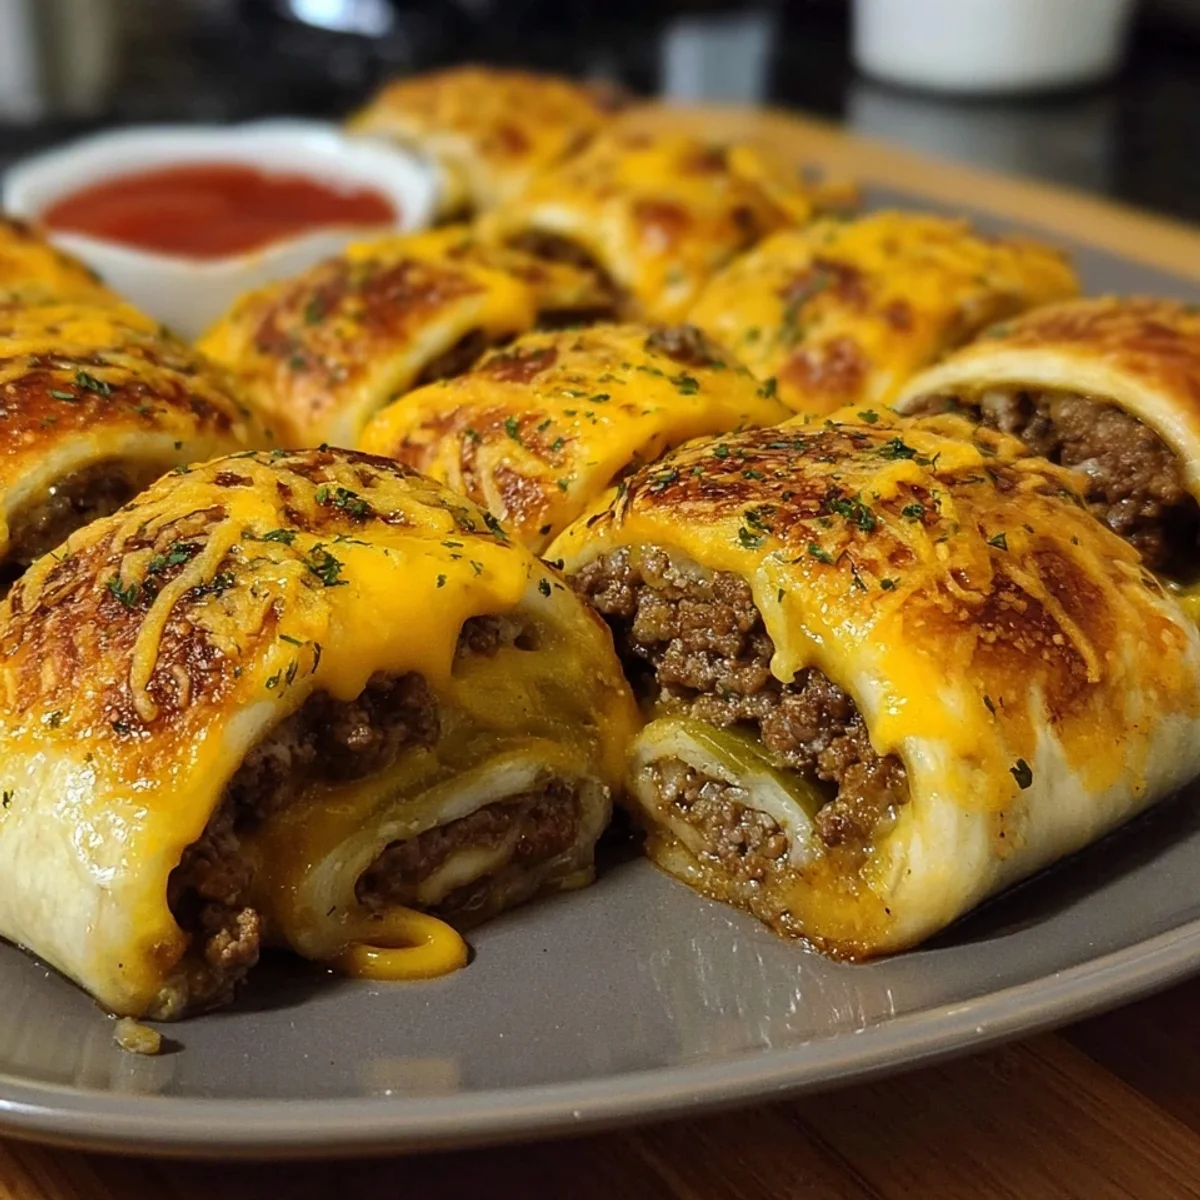
Ingredients for the Ultimate Beef Cheeseburger Rollups
- 1 lb 85/15 lean ground beef: This is the star of our show, hon! I always go for 85/15 lean ground beef because it gives you that perfect balance of flavor and not too much grease. You want that rich, savory burger taste without the filling being watery. This is what makes our Beef Cheeseburger Rollups sing, trust me. It’s hearty, comforting, and just what you need.
- 1/2 tsp garlic powder & 1/2 tsp onion powder: These two are my secret flavor boosters! They bring that classic burger joint aroma and taste without needing to chop fresh garlic or onion for the beef itself. So convenient, right? They just melt into the meat, creating a delicious base that pairs perfectly with all the fresh fixings we're adding later. Don't skip these little heroes!
- 6 low-carb flour tortillas (8-inch): Okay, the tortillas! I love using low-carb ones because they’re usually a bit sturdier and hold up beautifully when you’re rolling and searing. Plus, a little less guilt, you know? They get wonderfully crispy on the outside, giving you that satisfying crunch that contrasts so well with the juicy filling. Eight-inch is the sweet spot for a good-sized rollup.
- 6 slices cheddar cheese: Cheddar, my love! What's a cheeseburger without it, honestly? The way it melts into that warm beef filling is just pure magic, making these Beef Cheeseburger Rollups so incredibly comforting. I usually grab a medium or sharp cheddar for that extra zing, but mild works great too if you prefer. It’s the gooey, savory heart of these rollups, pulling all those burger flavors together.
- 1/2 cup finely diced dill pickles: Pickles! Oh my gosh, these are NON-NEGOTIABLE for me. That bright, tangy crunch cuts through the richness of the beef and cheese so perfectly. It’s that essential burger condiment, right? I dice them super fine so you get a little bit of pickle-y goodness in every single bite. It just elevates the whole experience, trust me.
- 1/4 cup finely diced red onion: Red onion brings a fantastic freshness and a subtle bite that I just adore in a burger. Dicing it finely is key here, you want that flavor without a huge raw onion chunk. It adds a little zing and a pop of color, making the filling feel vibrant and balanced. It’s a small touch, but it makes a big difference to the overall taste.
Making Beef Cheeseburger Rollups: Your Step-by-Step Guide
- Step 1: Prep Burger Fixings:
- First things first, let's get those fixings ready! Grab your dill pickles and red onion and dice them up super fine. This is a little arm workout, but trust me, it’s worth it for that perfect texture in every bite. Having everything prepped makes the rest of the cooking process a breeze. It’s all about setting yourself up for success, right? Get those little bowls ready, chef!
- Step 2: Cook Ground Beef:
- Time to get cooking! Heat a large skillet over medium-high heat. Toss in your ground beef and break it up with a spoon. You want it nice and crumbly. Season with garlic powder, onion powder, salt, and pepper. Cook until it’s beautifully browned all over, no pink bits in sight! This is where that amazing burger aroma starts filling your kitchen. Don’t forget to drain off ALL that excess fat, hon, or you’ll get soggy Beef Cheeseburger Rollups like I did once, oops!
- Step 3: Combine Beef Filling:
- Now for the magic! Once your beef is drained and back in the skillet (off the heat), stir in your finely diced pickles, red onion, ketchup, and mustard. Mix it all up until everything is wonderfully combined and coated. The vibrant colors and smells are just fantastic. This is the heart of your Beef Cheeseburger Rollups, bursting with those classic burger flavors. Give it a little taste adjust salt and pepper if you need to, but be careful not to eat it all before assembly!
- Step 4: Assemble Rollups:
- Okay, assembly line time! Lay out your low-carb tortillas on a clean surface. Place a slice of cheddar cheese in the center of each tortilla. Then, spoon about 1/3 to 1/2 cup of your delicious beef filling onto the cheese. Don’t overfill, or they’ll be tricky to roll! This stage is so satisfying, seeing all those components come together for our incredible Beef Cheeseburger Rollups. Get ready for some serious flavor!
- Step 5: Roll & Sear:
- Time to roll 'em up! Fold in the sides of each tortilla over the filling, then roll it tightly from the bottom up, like a little burrito. Once they’re all rolled, wipe out your skillet if needed, then add a tiny bit of oil over medium heat. Place the Beef Cheeseburger Rollups seam-side down in the hot skillet. Sear them for about 2-3 minutes per side, until they're golden brown and crispy, and that cheese is wonderfully melted. This step is key for that perfect texture!
- Step 6: Garnish & Serve:
- Alright, you’ve done it! Your gorgeous Beef Cheeseburger Rollups are ready for their close-up. Transfer them to a cutting board and let them cool for just a minute. You can slice them in half diagonally for a pretty presentation, or serve them whole. A sprinkle of fresh parsley or a dollop of extra ketchup or a zesty aioli on the side? Chef's kiss! Enjoy your delicious creation!
Cooking these always brings a smile to my face. It’s such a hands-on, satisfying process, from browning the beef to rolling each one perfectly. The kitchen fills with that comforting burger smell, and there’s something so rewarding about seeing those golden-brown tortillas crisp up. It’s quick, it’s fun, and honestly, it just makes me feel like a culinary wizard, even on the busiest days.
Keeping Your Beef Cheeseburger Rollups Fresh: Storage Secrets
Okay, so let's talk leftovers, because sometimes, miracles happen and you have some! If you’ve got any extra Beef Cheeseburger Rollups, let them cool completely first. Seriously, don't put warm food straight into the fridge unless you want a steamy, soggy mess. Once cool, pop them into an airtight container. They'll keep nicely in the fridge for up to 3 days. To reheat, my favorite way is in a dry skillet over medium-low heat to crisp them up again, about 3-4 minutes per side. The microwave works in a pinch, but they won't be as crispy. I once tried freezing a batch, and honestly, the tortillas got a bit gummy when thawed, so I don't recommend that!

Switching Things Up: Beef Cheeseburger Rollups Substitutions
I love experimenting, so I've tried a few twists on these! If you’re not a fan of ground beef, ground turkey or chicken works really well too, just make sure to season it generously. For cheese, pepper jack adds a nice little kick, or even a smoked gouda for something fancy. If you don't have low-carb tortillas, regular flour tortillas are totally fine, they just might not crisp up quite as much. And for the pickles and onions? Feel free to swap in some finely chopped jalapeños for heat, or even some caramelized onions for a sweeter note. Honestly, make these your own, that's the fun part of cooking!
Serving Your Beef Cheeseburger Rollups: Perfect Pairings
Alright, you've made these incredible rollups, now how do you serve them up with flair? For a casual dinner, a simple side of crispy oven fries or sweet potato wedges is always a winner. If you're going for a lighter vibe, a fresh green salad with a tangy vinaigrette cuts through the richness beautifully. Want to kick it up a notch? Offer a 'sauce bar'! Think extra ketchup and mustard, a zesty homemade fry sauce (mayo + ketchup + a dash of hot sauce), or even some ranch. For an appetizer spread, slice them diagonally and arrange them on a platter with some fancy toothpicks. They disappear fast, trust me!
The Fun History of Beef Cheeseburger Rollups
The beauty of these rollups is how they playfully mash up classic American comfort food with a bit of a global twist! The cheeseburger itself has a super rich history, evolving from simple beef patties in the late 19th century to the iconic American dish we know today, with cheese making its appearance in the 1920s. And the 'rollup' or 'wrap' concept? That’s got roots in so many cuisines worldwide, from Mexican burritos to Middle Eastern shawarmas. I think of these as a fun, modern take on that classic diner experience, where you get all the familiar flavors in a new, exciting, and totally dippable format. It’s comfort food, reinvented for your busy life!
So there you have it, my friend! My absolute favorite hack for a quick, ridiculously flavorful meal. These rollups are a total game-changer for busy weeknights or even last-minute gatherings. I really hope you give them a try and fall in love with them just like I did. Don't forget to tag me in your creations on social media I can't wait to see your masterpieces!

All Your Questions About Beef Cheeseburger Rollups, Answered!
- → Can I make Beef Cheeseburger Rollups ahead of time?
You can definitely prep the beef filling a day or two in advance and store it in the fridge. When you're ready to eat, just warm up the filling, assemble, and sear your Beef Cheeseburger Rollups. This makes dinner even quicker on a busy night, which is always a win in my book!
- → What's the best way to get crispy tortillas?
My go-to trick for crispy tortillas is using a dry skillet or just a tiny bit of oil over medium-low heat. Don't rush it! Let them sear for a few minutes on each side until they're golden brown and feel firm. That's how you get that satisfying crunch on your rollups.
- → Can I use other types of cheese?
Absolutely! While cheddar is classic for these rollups, feel free to experiment. Monterey Jack, Colby, or even a mild Provolone would work wonderfully. If you like a little heat, pepper jack is fantastic! Just make sure it’s a good melting cheese for that gooey center.
- → Are these good for meal prep?
They're pretty good for meal prep! I recommend prepping the beef filling and keeping it separate. Then, when you're ready to eat, assemble and sear the rollups fresh. The tortillas lose some crispness if stored already cooked, but they're still tasty for quick lunches.
- → Can I add other vegetables to the filling?
Oh, for sure! Finely diced bell peppers, sautéed mushrooms, or even a little spinach would be delicious additions. Just make sure whatever you add is finely diced and doesn't release too much moisture, or your rollups might get a bit soggy. Experiment and have fun!