

Okay, so picture this: it was a chaotic Tuesday morning, I was craving a bagel like crazy, but my pantry was... well, let's just say "sad." No yeast, no fancy flours. Just self-rising flour and a tub of Greek yogurt staring back at me. I remembered seeing a viral hack, and honestly, I was skeptical. But desperation leads to innovation, right? That day, my kitchen magic began, and these incredible high-protein Greek Yogurt Bagels were born! My life (and breakfasts) haven't been the same since.
Oh, the first time I tried to make these! I was so excited, I rushed the shaping part. Ended up with what I affectionately called "bagel-ish blobs" more like oddly shaped donuts, honestly. They still tasted amazing, but my husband kept asking if I was trying to invent a new breakfast pastry. Oops! Lesson learned: a little patience with the dough makes all the difference for perfect Greek Yogurt Bagels.
Ingredients You'll Need for These Greek Yogurt Bagels
- 2 cups self-rising flour: This is the true hero of our Greek Yogurt Bagels! Seriously, don't swap it for regular flour unless you know your way around yeast and baking powder. The leavening agents are already mixed in, making this recipe a total dream for beginners. I remember trying it once with all-purpose flour and adding baking powder separately... it was a lumpy, dense mess. Stick to self-rising, trust me, it’s what gives these bagels their perfect chew without all the fuss.
- 1 cup non-fat plain Greek yogurt: Our other superstar! This isn't just for protein, hon. The acidity in the Greek yogurt reacts with the self-rising flour, creating that amazing rise and a slight tang that makes these bagels taste so authentic. I've tried full-fat before, and while it works, the non-fat gives a lighter texture that I prefer. Plus, it keeps the protein content sky-high, which is kinda the point of these high-protein Greek Yogurt Bagels!
- 1/2 tsp salt: Salt isn't just for seasoning, it's essential for flavor development in baking! It balances out the tang from the yogurt and enhances all the other flavors in the dough. Skip it, and your bagels will taste flat and boring. I once forgot it entirely I know, a rookie mistake! The resulting bagels were so bland, I almost cried. Don't underestimate this tiny but mighty ingredient.
- 1/2 tsp garlic powder: Okay, so this is my secret weapon for that savory bagel shop vibe. A little garlic powder in the dough just elevates everything, giving it a subtle umami kick that pairs so well with the Everything But The Bagel topping. It's not overpowering, just enough to make you wonder, 'What is that amazing flavor?' Honestly, it makes these homemade bagels irresistible.
- 1/2 tsp onion powder: Just like the garlic powder, this little sprinkle of onion powder works wonders. It adds another layer of savory depth to the dough, complementing the garlic and building that classic bagel flavor profile. Together, these two powders in the dough give you a head start on that 'Everything' seasoning goodness. Trust me, it’s a game-changer for homemade Greek Yogurt Bagels.
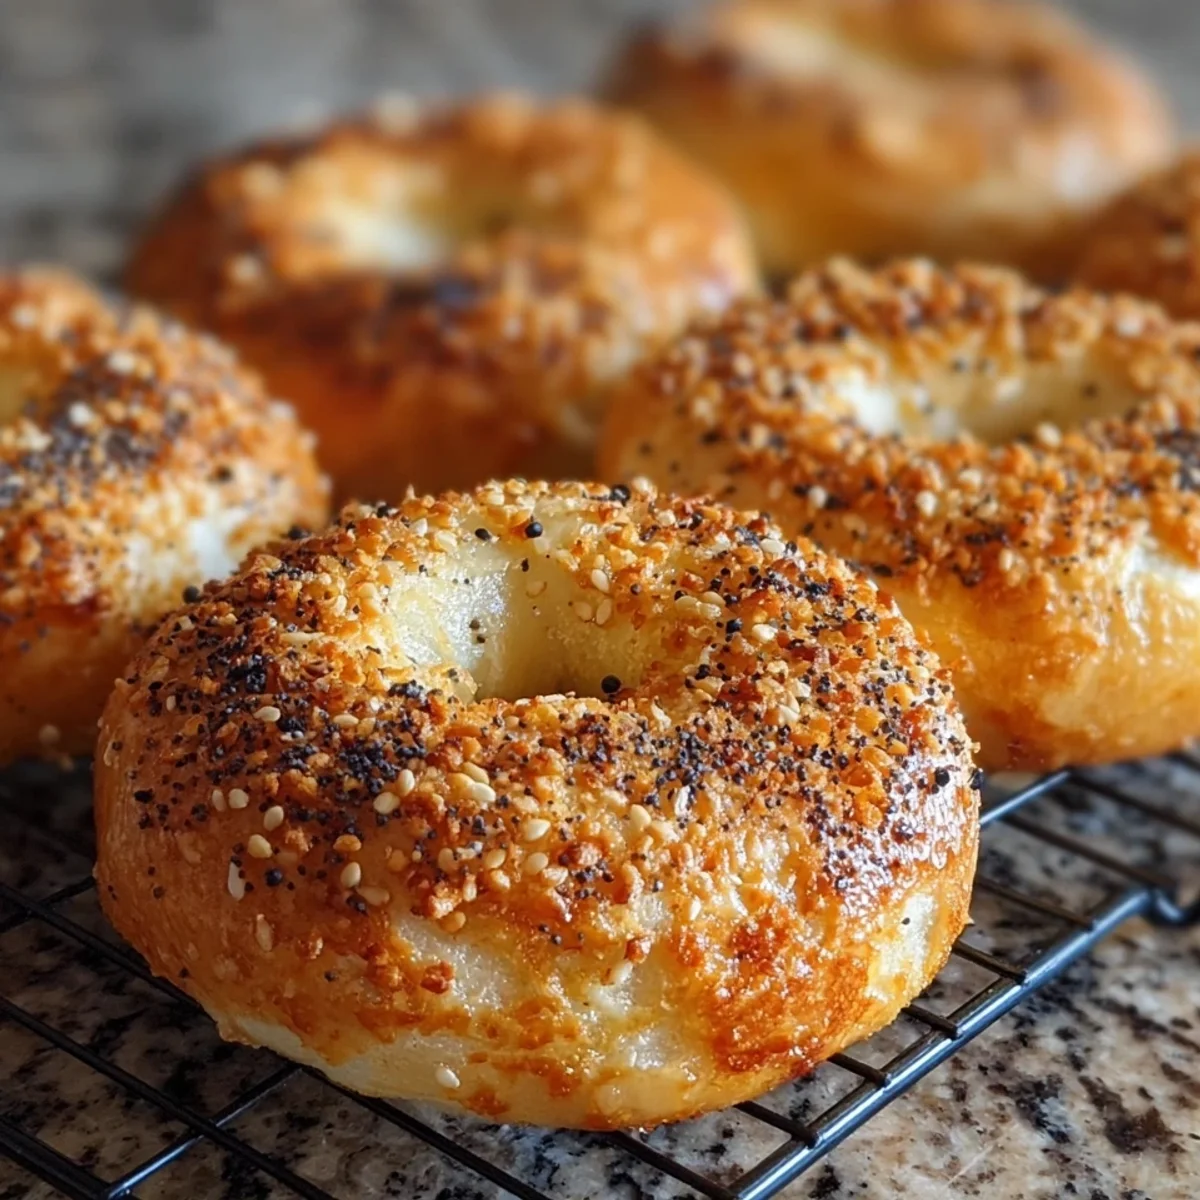
- Topping Blend: 2 tbsp white sesame seeds, 2 tbsp black sesame seeds, 1 tbsp poppy seeds, 1 tbsp dried minced garlic, 1 tbsp dried minced onion: This blend is the 'Everything But The Bagel' magic! It's what makes these look and taste like they came from a fancy bakery. The crunch from the seeds, the punch from the garlic and onion it's just perfection. Don't be shy with it! I once skimped on the topping, and my bagels looked so naked. Load it up, friends, it’s worth it for that classic finish.
Crafting Your Own Greek Yogurt Bagels: Step-by-Step
- Step 1: Preheat & Prep:
- First things first, get that oven screaming hot to 375°F (190°C) and line a baking sheet with parchment paper. This might seem like a no-brainer, but trust me, having everything ready before you start mixing means less stress and a smoother baking process. I’ve definitely started kneading only to realize my oven wasn’t preheated, leading to sad, waiting dough. We want those Greek Yogurt Bagels to hit the heat as soon as they're formed!
- Step 2: Mix Topping Blend:
- Time to create the 'Everything' magic! In a small bowl, just toss together your white sesame seeds, black sesame seeds, poppy seeds, dried minced garlic, and dried minced onion. Give it a good stir. This is going to be the crowning glory for our Greek Yogurt Bagels, giving them that irresistible texture and flavor. Having it ready to go means you can just dip and bake once your bagels are shaped super easy!
- Step 3: Prepare Dough:
- Now for the fun part! In a large bowl, whisk together your self-rising flour, salt, garlic powder, and onion powder. Then, add the Greek yogurt. Get in there with your hands and mix until a shaggy dough forms. I usually start with a spoon, but my hands always end up being the best tools. Knead it right in the bowl for about 3-5 minutes until it's smooth and elastic. This is crucial for the texture of your Greek Yogurt Bagels!
- Step 4: Form Bagels:
- Divide your dough into 8 equal pieces eyeballing it is fine, or use a kitchen scale for precision, if you’re fancy! Roll each piece into a 6-inch rope, then bring the ends together to form a circle, pinching them tightly to seal. Make sure that hole in the middle is a good size, it shrinks during baking, hon. This shaping step is key to getting those classic Greek Yogurt Bagels, so take your time and make them pretty!
- Step 5: Egg Wash & Top:
- In a small bowl, whisk one egg with a tablespoon of water this is our golden ticket to a shiny, crispy crust! Brush each bagel generously with the egg wash. This not only gives them a beautiful sheen but also helps all those glorious 'Everything' toppings stick. Dip each bagel into your prepared topping blend, pressing gently so it adheres. Don't be shy with the topping, it's what makes these Greek Yogurt Bagels sing!
- Step 6: Bake Bagels:
- Carefully place your topped bagels on the prepared baking sheet. Pop them into your preheated oven and bake for 20-25 minutes, or until they’re golden brown and sound hollow when tapped. Keep an eye on them, ovens vary! The smell that fills your kitchen while these Greek Yogurt Bagels bake is honestly heavenly. Once they're done, let them cool a bit on a wire rack before tearing into them. Warm bagels? Yes, please!
There's something so incredibly satisfying about pulling a tray of warm, golden Greek Yogurt Bagels from the oven. The aroma of toasted sesame, garlic, and onion fills the house, and I swear my family materializes in the kitchen like magic. It's a quick, rewarding bake that always feels like a little victory. Plus, knowing they're high-protein makes me feel a tiny bit virtuous while I devour one!
Keeping Your Greek Yogurt Bagels Fresh
So, you've made a batch of these glorious Greek Yogurt Bagels and somehow, miraculously, you have leftovers? Good for you! To keep them fresh, the best bet is to store them in an airtight container or a Ziploc bag at room temperature for up to 2-3 days. I've definitely left them on the counter in a regular bowl before, only to find them a bit stale and sad the next morning. Oops! For longer storage, slice them in half and pop them into a freezer-safe bag. They'll keep wonderfully for up to a month. Just toast them straight from frozen for a quick, delicious breakfast. Trust me, it's a lifesaver on busy mornings!

Swapping Ingredients for the Best Greek Yogurt Bagels
I've played around with substitutions a fair bit, trying to see what works and what doesn't with these Greek Yogurt Bagels. For the self-rising flour, you can make your own by combining 2 cups all-purpose flour with 3 teaspoons baking powder and 1 teaspoon salt. I've done it in a pinch, and it works, but the pre-made self-rising flour is just easier. As for the Greek yogurt, while non-fat is my go-to, I’ve used 2% plain Greek yogurt with good results too, it just makes the bagels a little richer. And the toppings? Go wild! Everything But The Bagel seasoning from the store is a fantastic shortcut if you don’t want to mix your own. Or try just poppy seeds, or even grated cheese for a cheesy bagel twist. Experimentation is half the fun!
Pairing Perfection: What to Serve with Greek Yogurt Bagels
Alright, you've got these warm, incredible Greek Yogurt Bagels now what? Honestly, they're fantastic on their own, especially fresh from the oven. But if you're feeling fancy, a smear of cream cheese is classic, right? I love a good plain cream cheese, but whipped cream cheese with chives? Divine! For something savory, try mashing up some avocado with a squeeze of lime and a sprinkle of red pepper flakes. Or, if you're going for a full meal, these make amazing breakfast sandwiches. Think scrambled eggs, a slice of cheddar, and some crispy bacon or turkey sausage. My kids love them toasted with a little butter and jam for a sweet treat too. The possibilities are endless, hon!
The Unexpected History of Greek Yogurt Bagels
You know, the history of bagels is super rich, dating back centuries in Jewish communities in Poland. They were originally boiled then baked, which gives them that unique chewy interior and crispy crust. But these quick Greek Yogurt Bagels? They’re a modern marvel, a fantastic shortcut born from the internet's love affair with simple, healthy hacks! It’s less about ancient traditions and more about busy home cooks (like me!) finding clever ways to bring a beloved classic to our tables without all the fuss. It's a testament to how food evolves, adapting to our modern lives. I think it’s pretty cool how a simple ingredient like Greek yogurt can totally transform a baking process and give us such a delicious, high-protein alternative.
There you have it, my friends! These high-protein Greek Yogurt Bagels are truly a game-changer for quick, satisfying breakfasts or snacks. I hope you love them as much as I do. Give them a try, experiment with your favorite toppings, and don't forget to tag me in your kitchen adventures! I can't wait to see your amazing creations. Happy baking, everyone!

Your Burning Questions About Greek Yogurt Bagels, Answered!
- Can I use regular all-purpose flour for Greek Yogurt Bagels?
You can, but you'll need to add leavening agents! For 2 cups all-purpose flour, mix in 3 teaspoons baking powder and 1 teaspoon salt. The texture might be slightly different, but it’ll still give you delicious Greek Yogurt Bagels. I've done it, and while self-rising is easier, this works in a pinch!
- My dough is too sticky, what should I do?
Oh, I’ve been there! The humidity can play a role. Try adding a tablespoon or two more self-rising flour, one at a time, until it's manageable. Also, lightly flouring your hands helps immensely when shaping. You want a dough that's pliable, not a gooey mess, for good Greek Yogurt Bagels.
- Can I make these Greek Yogurt Bagels ahead of time?
You can prep the dough and store it in the fridge for up to 24 hours before shaping and baking. Or, bake them completely and freeze them! They toast up beautifully from frozen. I often make a double batch on the weekend to have them ready for quick breakfasts during the week.
- What if I don't have Everything But The Bagel seasoning?
No problem at all! You can totally customize your toppings. Just use what you have: plain sesame seeds, poppy seeds, caraway seeds, or even a sprinkle of grated Parmesan cheese. Get creative! These Greek Yogurt Bagels are super versatile, so make them your own.
- Why did my bagels come out dense?
A couple of things could be at play, hon! Did you use self-rising flour or add enough baking powder if you used all-purpose? Also, be careful not to over-knead, that can make them tough. And make sure your oven was fully preheated. A hot oven helps them rise quickly for that fluffy texture we want in Greek Yogurt Bagels.